SQLite数据库
编辑教程SQLite数据库
在IOS中使用Sqlite来处理数据。如果你已经了解了SQL,那你可以很容易的掌握SQLite数据库的操作。
实例步骤
创建一个简单的View based application
选择项目文件,然后选择目标,添加libsqlite3.dylib库到选择框架
通过选择" File-> New -> File... -> "选择 Objective C class 创建新文件,单击下一步
"sub class of"为NSObject",类命名为DBManager
选择创建
更新DBManager.h,如下所示
#import <Foundation/Foundation.h>
#import <sqlite3.h>

@interface DBManager : NSObject
{
    NSString \*databasePath;
}

+(DBManager\*)getSharedInstance;
-(BOOL)createDB;
-(BOOL) saveData:(NSString\*)registerNumber name:(NSString\*)name
  department:(NSString\*)department year:(NSString\*)year;
-(NSArray\*) findByRegisterNumber:(NSString\*)registerNumber;

@end
更新DBManager.m,如下所示
#import "DBManager.h"
static DBManager \*sharedInstance = nil;
static sqlite3 \*database = nil;
static sqlite3\_stmt \*statement = nil;

@implementation DBManager

+(DBManager\*)getSharedInstance{
    if (!sharedInstance) {
        sharedInstance = \[\[super allocWithZone:NULL\]init\];
        \[sharedInstance createDB\];
    }
    return sharedInstance;
}

-(BOOL)createDB{
    NSString \*docsDir;
    NSArray \*dirPaths;
    // Get the documents directory
    dirPaths = NSSearchPathForDirectoriesInDomains
    (NSDocumentDirectory, NSUserDomainMask, YES);
    docsDir = dirPaths\[0\];
    // Build the path to the database file
    databasePath = \[\[NSString alloc\] initWithString:
    \[docsDir stringByAppendingPathComponent: @"student.db"\]\];
    BOOL isSuccess = YES;
    NSFileManager \*filemgr = \[NSFileManager defaultManager\];
    if (\[filemgr fileExistsAtPath: databasePath \] == NO)
    {
        const char \*dbpath = \[databasePath UTF8String\];
        if (sqlite3\_open(dbpath, &database) == SQLITE\_OK)
        {
            char \*errMsg;
            const char \*sql\_stmt =
            "create table if not exists studentsDetail (regno integer
            primary key, name text, department text, year text)";
            if (sqlite3\_exec(database, sql\_stmt, NULL, NULL, &errMsg)
               != SQLITE\_OK)
            {
                isSuccess = NO;
                NSLog(@"Failed to create table");
            }
            sqlite3\_close(database);
            return  isSuccess;
        }
        else {
            isSuccess = NO;
            NSLog(@"Failed to open/create database");
        }
    }
    return isSuccess;
}

- (BOOL) saveData:(NSString\*)registerNumber name:(NSString\*)name
  department:(NSString\*)department year:(NSString\*)year;
{
    const char \*dbpath = \[databasePath UTF8String\];
    if (sqlite3\_open(dbpath, &database) == SQLITE\_OK)
    {
        NSString \*insertSQL = \[NSString stringWithFormat:@"insert into
        studentsDetail (regno,name, department, year) values
        (\\"%d\\",\\"%@\\", \\"%@\\", \\"%@\\")",\[registerNumber integerValue\],
        name, department, year\];
        const char \*insert\_stmt = \[insertSQL UTF8String\];
        sqlite3\_prepare\_v2(database, insert\_stmt,-1, &statement, NULL);
        if (sqlite3\_step(statement) == SQLITE\_DONE)
        {
            return YES;
        }
        else {
            return NO;
        }
        sqlite3\_reset(statement);
    }
    return NO;
}

- (NSArray\*) findByRegisterNumber:(NSString\*)registerNumber
{
    const char \*dbpath = \[databasePath UTF8String\];
    if (sqlite3\_open(dbpath, &database) == SQLITE\_OK)
    {
        NSString \*querySQL = \[NSString stringWithFormat:
        @"select name, department, year from studentsDetail where
        regno=\\"%@\\"",registerNumber\];
        const char \*query\_stmt = \[querySQL UTF8String\];
        NSMutableArray \*resultArray = \[\[NSMutableArray alloc\]init\];
        if (sqlite3\_prepare\_v2(database,
           query\_stmt, -1, &statement, NULL) == SQLITE\_OK)
        {
            if (sqlite3\_step(statement) == SQLITE\_ROW)
            {
                NSString \*name = \[\[NSString alloc\] initWithUTF8String:
                 (const char \*) sqlite3\_column\_text(statement, 0)\];
                \[resultArray addObject:name\];
                NSString \*department = \[\[NSString alloc\] initWithUTF8String:
                (const char \*) sqlite3\_column\_text(statement, 1)\];
                \[resultArray addObject:department\];
                NSString \*year = \[\[NSString alloc\]initWithUTF8String:
                (const char \*) sqlite3\_column\_text(statement, 2)\];
                \[resultArray addObject:year\];
                return resultArray;
            }
            else{
                NSLog(@"Not found");
                return nil;
            }
            sqlite3\_reset(statement);
        }
    }
    return nil;
}
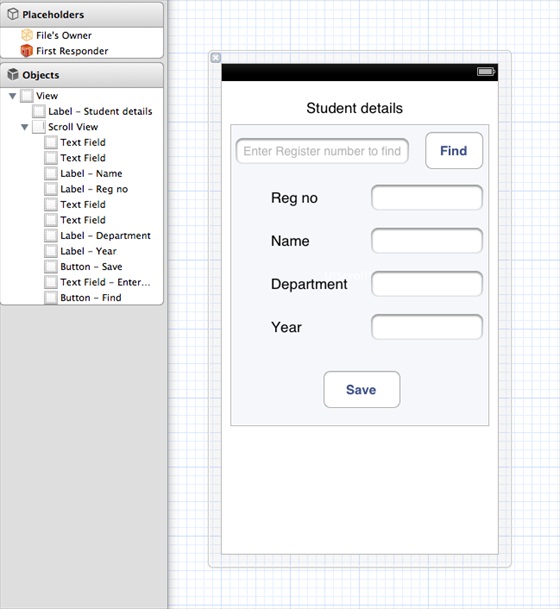
如图所示,更新ViewController.xib文件

为上述文本字段创建IBOutlets
为上述按钮创建IBAction
如下所示,更新ViewController.h
#import <UIKit/UIKit.h>
#import "DBManager.h"

@interface ViewController : UIViewController<UITextFieldDelegate>
{
    IBOutlet UITextField \*regNoTextField;
    IBOutlet UITextField \*nameTextField;
    IBOutlet UITextField \*departmentTextField;
    IBOutlet UITextField \*yearTextField;
    IBOutlet UITextField \*findByRegisterNumberTextField;
    IBOutlet UIScrollView \*myScrollView;
}

-(IBAction)saveData:(id)sender;
-(IBAction)findData:(id)sender;

@end
更新ViewController.m,如下所示
#import "ViewController.h"

@interface ViewController ()

@end

@implementation ViewController

- (id)initWithNibName:(NSString \*)nibNameOrNil bundle:(NSBundle \*)
  nibBundleOrNil
{
    self = \[super initWithNibName:nibNameOrNil bundle:nibBundleOrNil\];
    if (self) {
        // Custom initialization
    }
    return self;
}

- (void)viewDidLoad
{
    \[super viewDidLoad\];
    // Do any additional setup after loading the view from its nib.
}

- (void)didReceiveMemoryWarning
{
    \[super didReceiveMemoryWarning\];
    // Dispose of any resources that can be recreated.
}

-(IBAction)saveData:(id)sender{
    BOOL success = NO;
    NSString \*alertString = @"Data Insertion failed";
    if (regNoTextField.text.length>0 &&nameTextField.text.length>0 &&
    departmentTextField.text.length>0 &&yearTextField.text.length>0 )
    {
        success = \[\[DBManager getSharedInstance\]saveData:
        regNoTextField.text name:nameTextField.text department:
        departmentTextField.text year:yearTextField.text\];
    }
    else{
        alertString = @"Enter all fields";
    }
    if (success == NO) {
        UIAlertView \*alert = \[\[UIAlertView alloc\]initWithTitle:
        alertString message:nil
        delegate:nil cancelButtonTitle:@"OK" otherButtonTitles:nil\];
        \[alert show\];
    }
}

-(IBAction)findData:(id)sender{
    NSArray \*data = \[\[DBManager getSharedInstance\]findByRegisterNumber:
    findByRegisterNumberTextField.text\];
    if (data == nil) {
        UIAlertView \*alert = \[\[UIAlertView alloc\]initWithTitle:
        @"Data not found" message:nil delegate:nil cancelButtonTitle:
        @"OK" otherButtonTitles:nil\];
        \[alert show\];
        regNoTextField.text = @"";
        nameTextField.text =@"";
        departmentTextField.text = @"";
        yearTextField.text =@"";
    }
    else{
        regNoTextField.text = findByRegisterNumberTextField.text;
        nameTextField.text =\[data objectAtIndex:0\];
        departmentTextField.text = \[data objectAtIndex:1\];
        yearTextField.text =\[data objectAtIndex:2\];
    }
}

#pragma mark - Text field delegate
-(void)textFieldDidBeginEditing:(UITextField \*)textField{
    \[myScrollView setFrame:CGRectMake(10, 50, 300, 200)\];
    \[myScrollView setContentSize:CGSizeMake(300, 350)\];
}
-(void)textFieldDidEndEditing:(UITextField \*)textField{
    \[myScrollView setFrame:CGRectMake(10, 50, 300, 350)\];

}
-(BOOL) textFieldShouldReturn:(UITextField \*)textField{

    \[textField resignFirstResponder\];
    return YES;
}
@end
输出
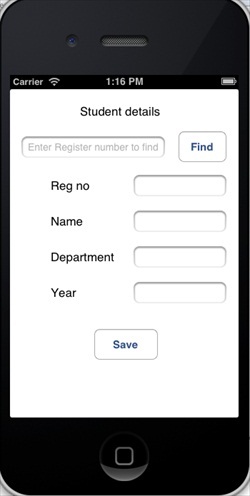
现在当我们运行应用程序时,我们就会获得下面的输出,我们可以在其中添加及查找学生的详细信息

Mos固件,小电视必刷固件
ES6 教程
Vue.js 教程
JSON 教程
jQuery 教程
HTML 教程
HTML 5 教程
CSS 教程
CSS3 教程
JavaScript 教程
DHTML 教程
JSON在线格式化工具
JS在线运行
JSON解析格式化
jsfiddle中国国内版本
JS代码在线运行
PHP代码在线运行
Java代码在线运行
C语言代码在线运行
C++代码在线运行
Python代码在线运行
Go语言代码在线运行
C#代码在线运行
JSRUN闪电教程系统是国内最先开创的教程维护系统, 所有工程师都可以参与共同维护的闪电教程,让知识的积累变得统一完整、自成体系。
大家可以一起参与进共编,让零散的知识点帮助更多的人。
X
选择支付方式:


立即支付

¥
9.99
无法付款,请点击这里
金额: 0 元
备注:
转账时请填写正确的金额和备注信息,到账由人工处理,可能需要较长时间
备注:
转账时请填写正确的金额和备注信息,到账由人工处理,可能需要较长时间
如有疑问请联系QQ:565830900
正在生成二维码, 此过程可能需要15秒钟
