湿度传感器
编辑教程湿度传感器
在本节中,我们将学习如何使用不同的传感器连接我们的Arduino板。我们将讨论以下传感器:
- 湿度传感器(DHT22)
- 温度传感器(LM35)
- 水位检测传感器(简单水触发器)
- PIR传感器
- 超声波传感器
- GPS
湿度传感器(DHT22)
DHT-22(也称为AM2302)是一个数字输出,相对湿度和温度传感器。它使用电容式湿度传感器和热敏电阻来测量周围空气,并在数据引脚上发送数字信号。
在本例中,你将学习如何将此传感器与Arduino UNO一起使用。室温和湿度将打印到串口监视器上。
DHT-22传感器
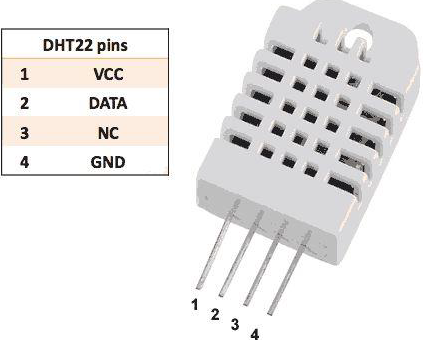
连接很简单。左边的第一个引脚为3-5V电源,第二个引脚连接到数据输入引脚,最右边的引脚接地。
技术细节
- 电源 - 3-5V
- 最大电流 - 2.5mA
- 湿度 - 0-100%,精确度为2-5%
- 温度 - 40至80°C,精确度为±0.5°C
必需的组件
你将需要以下组件:
- 1 × Breadboard 面包板
- 1 × Arduino Uno R3
- 1 × DHT22
- 1 × 10K欧姆电阻
程序
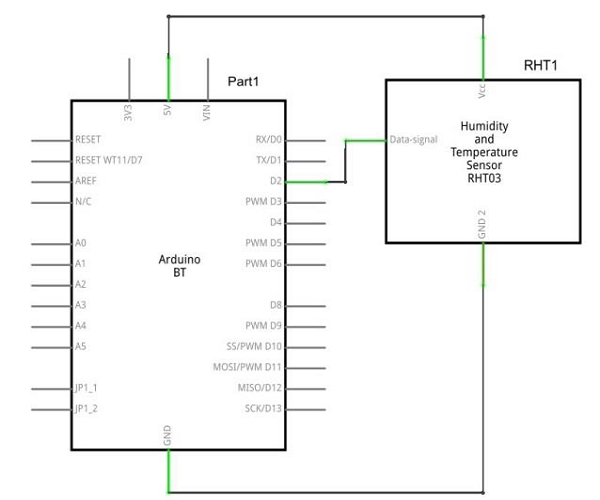
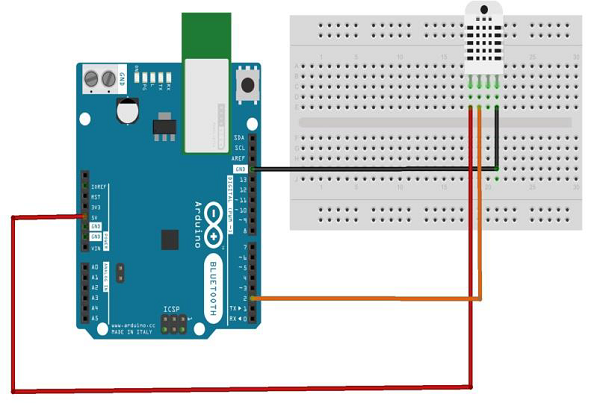
按照电路图连接面包板上的组件,如下图所示。
草图
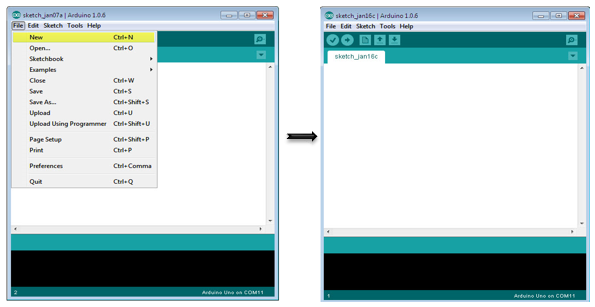
在计算机上打开Arduino IDE软件。使用Arduino语言进行编码控制你的电路。通过单击“New”打开一个新的草图文件。
Arduino代码
// Example testing sketch for various DHT humidity/temperature sensors

#include "DHT.h"
#define DHTPIN 2 // what digital pin we're connected to
// Uncomment whatever type you're using!
//#define DHTTYPE DHT11 // DHT 11
#define DHTTYPE DHT22 // DHT 22 (AM2302), AM2321
//#define DHTTYPE DHT21 // DHT 21 (AM2301)
// Connect pin 1 (on the left) of the sensor to +5V
// NOTE: If using a board with 3.3V logic like an Arduino Due connect pin 1
// to 3.3V instead of 5V!
// Connect pin 2 of the sensor to whatever your DHTPIN is
// Connect pin 4 (on the right) of the sensor to GROUND
// Connect a 10K resistor from pin 2 (data) to pin 1 (power) of the sensor
// Initialize DHT sensor.
// Note that older versions of this library took an optional third parameter to
// tweak the timings for faster processors. This parameter is no longer needed
// as the current DHT reading algorithm adjusts itself to work on faster procs.
DHT dht(DHTPIN, DHTTYPE);

void setup() {
   Serial.begin(9600);
   Serial.println("DHTxx test!");
   dht.begin();
}

void loop() {
   delay(2000); // Wait a few seconds between measurements
   float h = dht.readHumidity();
   // Reading temperature or humidity takes about 250 milliseconds!
   float t = dht.readTemperature();
   // Read temperature as Celsius (the default)
   float f = dht.readTemperature(true);
   // Read temperature as Fahrenheit (isFahrenheit = true)
   // Check if any reads failed and exit early (to try again).
   if (isnan(h) || isnan(t) || isnan(f)) {
      Serial.println("Failed to read from DHT sensor!");
      return;
   }

   // Compute heat index in Fahrenheit (the default)
   float hif = dht.computeHeatIndex(f, h);
   // Compute heat index in Celsius (isFahreheit = false)
   float hic = dht.computeHeatIndex(t, h, false);
   Serial.print ("Humidity: ");
   Serial.print (h);
   Serial.print (" %\\t");
   Serial.print ("Temperature: ");
   Serial.print (t);
   Serial.print (" \*C ");
   Serial.print (f);
   Serial.print (" \*F\\t");
   Serial.print ("Heat index: ");
   Serial.print (hic);
   Serial.print (" \*C ");
   Serial.print (hif);
   Serial.println (" \*F");
}
代码说明
DHT22传感器具有四个端子连接到电路板的端子(Vcc,DATA,NC,GND),如下:
- DATA引脚连接到Arduino的2号引脚号
- Vcc引脚连接到Arduino板的5伏电压
- GND引脚连接到Arduino板的接地
- 我们需要在DATA和Vcc引脚之间连接10k欧姆电阻(上拉电阻)
一旦硬件连接完成,你需要添加DHT22库到你的Arduino库文件,如前所述。
结果
你将看到串口监视器上的温度和湿度显示,每2秒更新一次。
Mos固件,小电视必刷固件
ES6 教程
Vue.js 教程
JSON 教程
jQuery 教程
HTML 教程
HTML 5 教程
CSS 教程
CSS3 教程
JavaScript 教程
DHTML 教程
JSON在线格式化工具
JS在线运行
JSON解析格式化
jsfiddle中国国内版本
JS代码在线运行
PHP代码在线运行
Java代码在线运行
C语言代码在线运行
C++代码在线运行
Python代码在线运行
Go语言代码在线运行
C#代码在线运行
JSRUN闪电教程系统是国内最先开创的教程维护系统, 所有工程师都可以参与共同维护的闪电教程,让知识的积累变得统一完整、自成体系。
大家可以一起参与进共编,让零散的知识点帮助更多的人。
X

选择支付方式:


立即支付
¥
9.99
无法付款,请点击这里
金额: 0 元
备注:
转账时请填写正确的金额和备注信息,到账由人工处理,可能需要较长时间
备注:
转账时请填写正确的金额和备注信息,到账由人工处理,可能需要较长时间
如有疑问请联系QQ:565830900
正在生成二维码, 此过程可能需要15秒钟